Using Docker containers
This Docker-based poller deployment method is currently in BETA.
Centreon also provides a Docker-based deployment for pollers. Instead of a single
monolithic container, each poller component runs in its own dedicated container
(Centreon Engine, Gorgone, and optionally SNMP trap handling and VMware
monitoring), orchestrated by a single docker-compose.yaml file.
This deployment method relies on a generated installation command that downloads
and runs an installer script on the target Docker host. The script generates the
.env and docker-compose.yaml files for you and starts the stack.
See Users and groups for the system users (
centreon-engine,centreon-gorgone, etc.) used inside these containers.
Prerequisites
- A Linux host with Docker Engine and the Docker Compose v2 plugin
installed (
docker compose versionmust succeed). - Outbound network access from this host to your Centreon central server.
- If you plan to receive SNMP traps on this poller, UDP port 162 must be reachable on this host.
- If you plan to monitor VMware infrastructure from this poller, the
centreon-vmwareDocker image must be built beforehand (see Optional: centreon-vmware container).
Step 1: Generate the install command
-
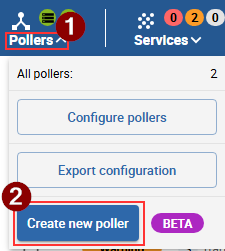
In the Centreon UI, open the Pollers menu at the top of the screen and click Create new poller (currently in BETA).
-
Fill in the poller's information, select its environment and token, then generate the installation command:
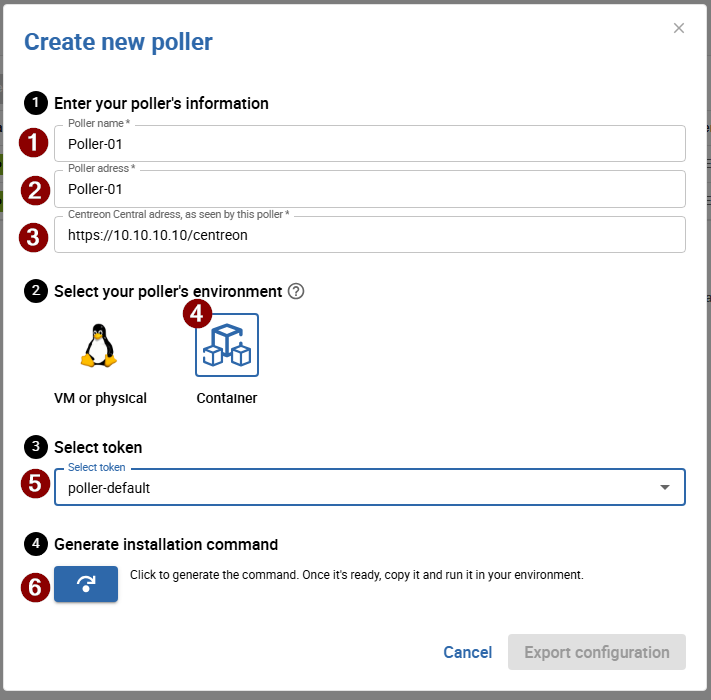
- Poller name: a unique name for this poller.
- Poller address: the poller's own address (see note below).
- Centreon Central address, as seen by this poller: the URL this poller uses to reach the central server.
- Container: the environment to generate the command for (as opposed to VM or physical).
- Select token: an existing Gorgone poller token.
- The button that generates the installation command.
The Poller address does not affect connectivity: Gorgone uses PullWSS, so the poller always initiates the connection to the central server, not the other way around.
-
Copy the generated installation command, and keep this window open. It looks like this:
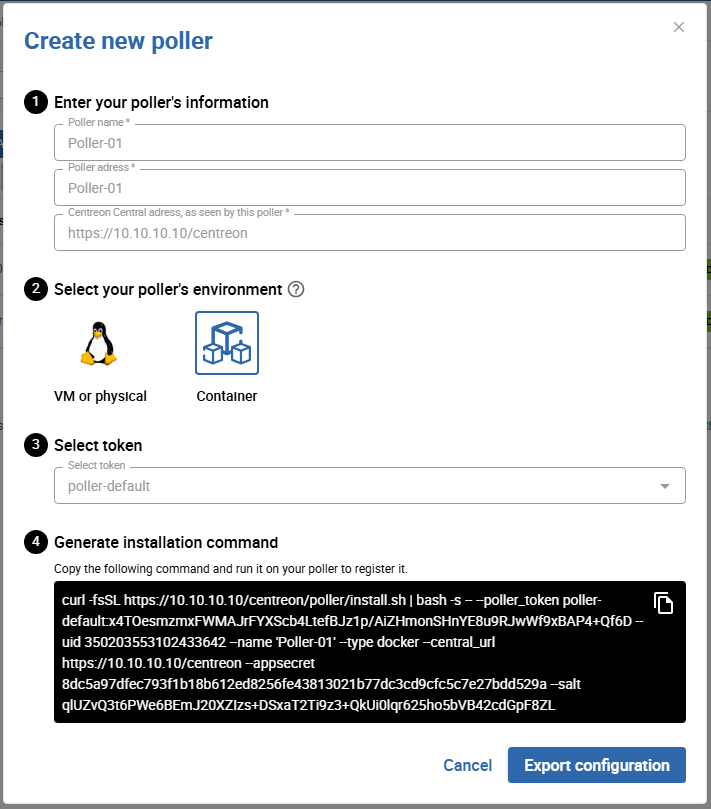 curl -fsSL <CENTRAL_URL>/poller/install.sh | bash -s -- \--type docker \--poller_token <TOKEN_NAME>:<TOKEN_SECRET> \--uid <POLLER_UID> \--name '<POLLER_NAME>' \--central_url <CENTRAL_URL> \--appsecret <APP_SECRET> \--salt <SALT>
Replace <CENTRAL_URL> with the full URL of your Centreon central server, including its web application base path (for example,
https://centreon.example.com/centreon).
Step 2: Run the install command on the Docker host
Run the copied command as a user who is allowed to use Docker on the target host. The script:
- Checks that Docker and the Docker Compose v2 plugin are available.
- Generates a
.envfile and adocker-compose.yamlfile in the current directory. - Starts the stack with
docker compose up -d, unless--no-startwas added to the command (in that case, start it yourself later withdocker compose up -d).
By default, the generated stack always includes two services:
- centengine: Centreon Engine, the monitoring engine.
- gorgone: Gorgone, in charge of retrieving the poller's configuration and communicating with the central server.
Step 3: Add optional services
Add these flags to the install command before running it to include additional services in the generated stack:
| Flag | Effect |
|---|---|
--with-snmptrap | Adds the snmptrapd and centreontrapd services, for passive monitoring via SNMP traps. |
--with-vmware | Adds the centreon-vmware service (see prerequisite below). |
--with-cma | Mounts TLS certificates and exposes port 4317, for pollers that accept connections from the Centreon Monitoring Agent (CMA) over OpenTelemetry gRPC. |
--tz <timezone> | Sets the container timezone (default: UTC). |
--debug true | Enables debug logging on the services. |
--gorgone-ssl <true|false> | Overrides the SSL setting used for the Gorgone connection to the central server. |
--no-start | Only generates .env and docker-compose.yaml; does not start the stack. |
If you already ran the install command without these flags, you can also add
the corresponding service(s) by hand to the generated docker-compose.yaml
and .env files, then run docker compose up -d again.
Optional: centreon-vmware container
Monitoring VMware infrastructure requires the proprietary VMware Perl SDK,
which cannot be redistributed for licensing reasons. Because of this, the
centreon-vmware container image is not published on a registry. The
generated docker-compose.yaml references it as
connector-vmware:${VMWARE_TAG:-local} with pull_policy: never, so you must
build it locally, on the Docker host, before using --with-vmware.
Clone the centreon-plugins repository and build the image from it:
git clone https://github.com/centreon/centreon-plugins.git
cd centreon-plugins
docker build \
  --build-arg PACKAGE_SOURCE=repo \
  --build-arg WITH_SDK=true \
  --file .github/docker/connector/Dockerfile.connector-vmware \
  --tag connector-vmware:local \
  .
WITH_SDK=truerequires the VMware vSphere Perl SDK and vSAN SDK archives, which you must download yourself from the Broadcom developer portal. See the prerequisites of the VMware ESX plugin pack for instructions on obtaining these files. Place the downloaded archives in the./centreon-plugins/sdks-vmwaredirectory before running thedocker buildcommand above. Building withWITH_SDK=falseproduces a working image, but it cannot decrypt encrypted vCenter credentials.
Custom checks and plugin dependencies
The centengine container can install custom check scripts and extra APT
dependencies without rebuilding the image. Add the corresponding volumes to
the centengine service in the generated docker-compose.yaml:
    volumes:
      # Custom plugin scripts (must be executable)
      - ./custom-plugins:/usr/lib/nagios/plugins/custom:ro
      # Extra APT packages, installed at startup
      - ./custom-deps.json:/etc/centreon-engine/custom-deps.json:ro
-
Custom plugin scripts placed in
./custom-pluginsbecome available under/usr/lib/nagios/plugins/custominside the container. -
custom-deps.jsonlists arbitrary APT packages to install, for example:{"apt": ["snmp", "jq"]}This file is read when the container starts, and watched for changes afterward: editing it on the host triggers an automatic install of the listed packages, with no need to restart the container. Package installation runs in the background, so
centengineis not blocked while it happens.
Centreon monitoring plugins (from Monitoring Connectors) don't need to be configured here: Gorgone installs them automatically, in the same shared configuration volume, whenever Automatic installation of plugins is enabled on the Configuration > Connectors > Monitoring Connectors page and the poller's configuration is deployed from the central server. See Monitoring Connectors for details.
Baking dependencies into a custom image
Instead of installing dependencies at container startup, you can build your own image on top of the official one and install everything at build time:
FROM docker.centreon.com/centreon/centreon-engine-trixie:26.10

RUN apt-get update && apt-get install -y --no-install-recommends \
      snmp \
      jq \
    && rm -rf /var/lib/apt/lists/*
Build it, then reference it as ENGINE_TAG (or override the image: value
directly) in your docker-compose.yaml. The main advantage of this approach
is startup time: when a poller needs many dependencies, installing them once
at build time is faster than installing them every time the container starts
via custom-deps.json.
Optional: Centreon Monitoring Agent (CMA) support
Add --with-cma to the install command so that centengine can accept
connections from the Centreon Monitoring Agent over OpenTelemetry gRPC. This
adds the following to the centengine service:
    volumes:
      - ./certs/poller.crt:/etc/pki/poller.crt:ro
      - ./certs/poller.key:/etc/pki/poller.key:ro
    ports:
      - "4317:4317"
Generate the TLS certificates and configure the agent side following Configuring certificates and Setting up the agent's environment.
Generated files reference
The docker-compose.yaml generated by the install script wires the services
together using named Docker volumes, so you don't need to configure this
yourself:
| Volume | Shared between | Purpose |
|---|---|---|
poller-engine | centengine, gorgone | Centreon Engine configuration (/etc/centreon-engine) |
poller-broker | centengine, gorgone | Centreon Broker configuration (/etc/centreon-broker) |
poller-centcmd | centengine, gorgone, centreontrapd | Centreon Engine's external command pipe (/var/lib/centreon-engine/rw) |
poller-snmp-spool | snmptrapd, centreontrapd | Spool directory where received traps are written and then processed |
poller-snmp-traps | gorgone, centreontrapd | SNMP trap definitions pushed by the central server |
Each service also has a Docker healthcheck, so docker compose ps reports
healthy once a service is fully up.
Step 4: Confirm the connection and export the configuration
The poller creation window does not show a "connected" status by itself.
Instead, check the health status of the gorgone container on the Docker
host:
docker compose ps
Once gorgone reports healthy, the connection to the central server is
established. Go back to the poller creation window and click
Export configuration to push the monitoring configuration to the poller.
The poller then shows up as running on the Configuration > Pollers page:

If gorgone does not become healthy after a few minutes, check its logs
(docker compose logs gorgone), then see
Attach a poller to a central or a remote server
and Communications between servers
for more details on how pollers register and communicate with the central
server.
Step 5: Secure your platform
Remember to secure your Centreon platform following our recommendations.