Receiving and configuring notifications
You can configure Experience Monitoring to send you a notification when one of your user journeys fails or times out.
Email notifications are available to all users. Additionaly, some licenses allow receiving notifications by SMS, Slack, or webhooks. To subscribe to this option, contact your sales representative. Notifications are also available within the Experience Monitoring platform. Click on your own icon at the top right then click Notifications.
Note that, while email, webhook or slack notifications are unlimited, there is a set amount of SMS available per site per month. To see your SMS quota, go to Configuration, then the Site tab. You will find your quota in the Alerts & Reports section.
Setting up notifications
Contact information
Each user must individually set the phone number or accounts on which they will receive the notifications. To do so, click on your own icon at the top right then click My account.
The email, phone number and slack accounts listed on your profile information are the ones that will be used to send you notifications.
Additionaly, Experience Monitoring allows users to receive alerts via a webhook for better integration with other tools and systems. For example, if you use Microsoft Teams instead of Slack, a webhook will allow the integration. When an incident is detected on a monitored web application, Experience Monitoring can send an HTTP POST request to a URL specified by the user. This URL can be protected by htaccess, and the user can also define HTTP headers if needed. You can configure this URL by clicking the word Webhoo for a newly created or existing alert, then clicking the pencil icon.
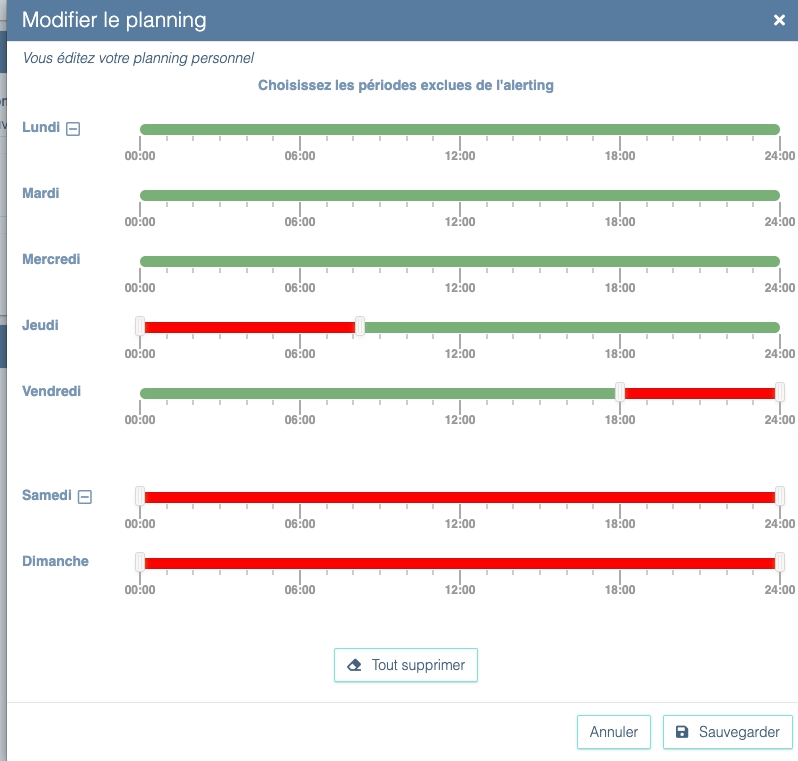
Alerting schedule
Users can define periods during which they do not receive alerts to better reflect their working hours or availability. By default, users are considered available 24/7, click on the green bars to add red areas which indicate the times where the user will not receive notifications.
Additionaly, each alert can be enabled/disabled for specific time ranges so it doesn't notify subscribed people regardless of their personal schedule.
Enabling notifications
Having informed your contact information and times of availability, click on Configuration then click on the Alerting tab.
You can choose to subscribe to the notifications of an existing notification by clicking on the list of users who receive notifications. A window with the subscribed users pops up, click on "Subscribe yourself" to add yourself to this notification and check the boxes for the types of notifications you will receive.
Admins can also subscribe or unsubscribe other users from a notification.
If the notification you wish to subscribe to hasn't been created, click on the + icon to create it yourself.
- Decide for which type of issue the notification will be sent: the user journey status or a metric.
- Choose which user journey will be covered by this notification.
- Decide who should receive this notification and how. To pick yourself click on the subscribe yourself button
- Determine the thresholds that will trigger this notification. Click on the gears icon to open the notification threshold editor. The first two fields below Alert when determine the criteria to start sending notifications. The field below Mark as solved determines when to consider that a journey is no longer having issues and so notifications should stop.
In addition to notifications, you can subscribe daily, weekly or monthly reports of the performance of your user journeys with the Digests option.