Monitoring non-public user journeys
A private Synthetic Monitoring Zone (STM) allows you to monitor your user journeys on internal domains or networks specific to your organization using a probe deployed inside your infrastructure.
Prerequisites:
- Docker is installed on the machine that will execute the commands.
- Docker credentials provided by Centreon (see step 6).
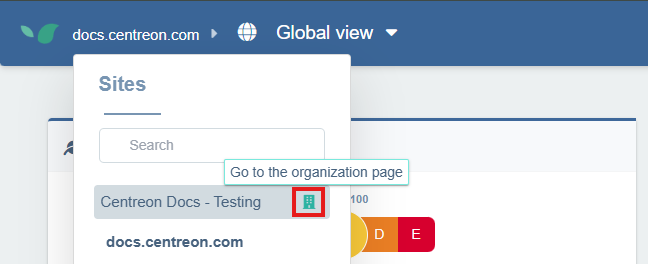
Step 1: Open the organization page
- From the Global View, open the site selector at the top left and open your organization’s page.
Step 2: Access the STM Zones tab
- On your organization’s configuration page, click the Synthetic Monitoring Zones tab.
Step 3: Create a new STM zone
- Click + New Synthetic Monitoring Zone, give it a meaningful name (e.g., Paris Office), then click + Create. Your new zone now appears in the list.
Step 4: Associate a probe to an STM
- Click Associate a probe to the right of your zone. You can also click in the upper-right corner in which case, make sure the right zone to select the right zone in the new window.
A window opens with two Docker commands:
- the first one is used to log in to the Centreon Docker registry (see step 5),
- the second one is used to create and launch the probe (see step 6).
Step 5: Obtain the Docker credentials from Keeper
The credentials are sent to you by Centreon via a secure Keeper link.
-
Contact Centreon to receive the Keeper link. Save the credentials in your own vault.
-
Once you have obtained the credentials, log in to the Centreon Docker registry:
docker login docker.centreon.com/centreon-dem-beta
Username: \<username>
Password: \<password>
Step 6: Create and launch the probe
To create and launch the probe, execute the second command you obtained at step 4, if you had previously closed the window, you can simply open it again.
Once launched, the probe is automatically saved and appears in the STM Zones list.
Step 7: Associate the zone with a user journey
-
Go to Configuration > User Journeys tab. On the journey you want to run from your private zone, click on the three dots on the right, then click on Advanced.
-
In the Advanced configuration window, scroll down to the Synthetic Monitoring Zones section. Your private zone appears under Private Zones. Select it. Click Save
-
Your internal journey monitoring is now in place! You can analyze it as you would for a regular user journey.
Troubleshooting
This domain name is not allowed for your website
If you encounter this message when trying to set a navigation action to a link, it means the domain you are trying to navigate to has not been authorized by Centreon yet.
If you haven't done so yet, open a ticket with Centreon Support for your domain to be manually approved.